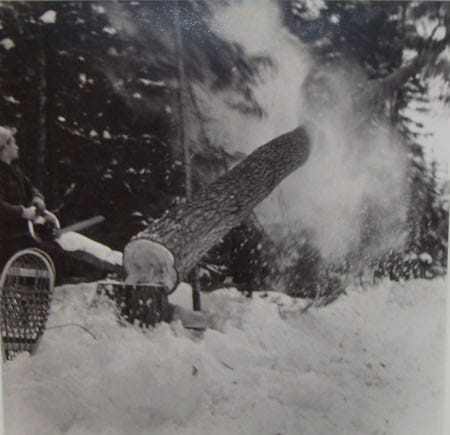
A few years ago, AoM reader Will shared his tips on how to split firewood. Great advice, but where do you get those small logs to split in the first place? You can buy logs, but a man heads into the forest to get them at their source. It’s a manly job that requires you to harness your inner lumberjack as you fell, limb, and buck your own tree.
When Kate and I were in Vermont a couple of years ago, Kate’s Uncle Buzz taught me how to fell a tree. Buzz bought a cheap tree lot deep in the woods, and he uses the trees not only for his own firewood needs, but also to supply the wood he cuts, splits, and distributes to less fortunate neighbors who need the logs to heat their homes during the long winter.
If you ever need to fell a tree, here’s how it’s done.
What You Need
- A chainsaw
- A tree to fell
- A beard (optional, but recommended)
Safety First
Felling trees is a dangerous job. The Occupational Safety and Health Administration reports that “more people are killed while felling trees than during any other logging activity.” So safety should be your top priority. A failure to keep your wits about you can be deadly.
Safety Equipment. When wielding a chainsaw and felling, limbing, and bucking trees, you need to wear the following protective items:
- Helmet
- Eye and face protection
- Hearing protection
- Protective chaps
- Steel toed leather boots with high ankle support
- Gloves
- Long sleeved shirt
Be alert and aware of your surroundings while operating the chainsaw.
Plan and clear a retreat path. While you have some control over which direction your tree will fall, things don’t always go the way you intend. That’s why you need to plan and clear a retreat path so you don’t get hammered into the ground by a falling tree Wile E. Coyote style.
The safest way to retreat is in the opposite direction you planned for the tree to fall and in a 45 degree angle from the side of the tree, like so:
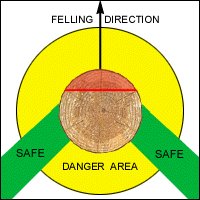
Safe retreat paths
Clear any obstacles out of your retreat path so you don’t trip while retreating.
In the event you need to retreat from an errantly falling tree, get away quickly, but don’t turn your back on the tumbling timber.
How to Fell a Tree
Plan where you want the tree to fall. Take a look at your surroundings and decide which way you want the tree to fall. You can control the direction your tree falls by cutting your first notch on the side of the tree that faces the direction you want the tree to fall.
Use common sense when planning where you want your tree to fall. Avoid felling a tree onto your car, home, uneven ground, large boulders, and cute kittens. Ideally, you want to have the tree fall in as clear an area as possible so that it doesn’t get caught in other tree limbs on the way down. That can be tough to do in dense forests like they have in Vermont, but do the best you can.
When planning where you want your tree to fall, take into account which way the tree leans. It is generally easier and safer to fell a tree in the direction that it is already leaning. Let gravity help you. If the tree is leaning in an unsafe direction, you have two options: 1) manipulate the tree to fall in a different direction using strategic notch placement, or 2) pick another tree to fell.
Cut your notch. Cut an open-face notch on the side of the tree that faces the direction you want the tree to fall. Make your top cut first. Begin your top cut at any height on the tree above the ground, allowing enough room for the undercut.
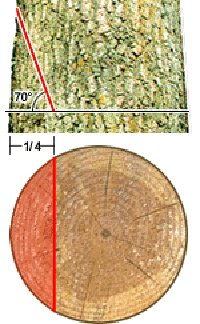
First cut should be downward at an angle of 70°. Stop when the cut reaches one-fourth to one-third of the trunk’s diameter.
Now it’s time to make your bottom cut for the notch.
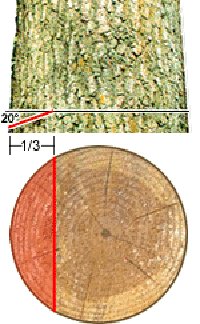
Second cut should be upward at a 20° angle.
Cut upward at a 20° angle. Stop when the cut reaches the end point of your top cut. When you’re done making both cuts, you should be left with a 90° notch opening.
Back cut. The back cut is made on the opposite side of the notch. The back cut disconnects almost all of the tree from the stump, leaving a hinge that helps control the tree’s fall.
Begin on the opposite side of the notch, slightly above the notched corner.
Cut flat along a horizontal plane.
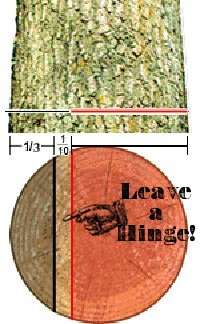
When making your back cut, don’t cut all the way through. Leave a hinge.
Don’t cut all the way through! If you do, your saw could get stuck in the tree, or even worse, the tree could start falling in a direction you didn’t plan for it to go. You want to stop cutting at a point that will leave a hinge width that is one-tenth the tree’s diameter.
Yell “Timber!” If you’ve done everything right, the tree will begin to fall over the notch you’ve created. Boom. You just felled a tree. Check your chest. Two to three new hairs should have sprung up.
How to Limb a Tree
Limbing a tree just means cutting off all the small limbs and branches of the tree so that you’re left with only the trunk. Just take your chainsaw and cut off all the limbs as close as you can to the trunk.
How to Buck a Tree
Bucking a tree means cutting the tree into usable lengths. If you’re going to use your wood for firewood, you need to buck the tree into lengths that will fit into your stove or fire ring. The cut pieces after you buck a tree are called rounds. Rounds are then split into pieces, and you don’t want them to be too long to fit into your stove. Something else to consider: the shorter the round, the easier it is to split.
If the tree is lying flat on the ground, make your buck cut from the top. Let up on the downward pressure when you’ve almost cut all the way through the tree. You don’t want your chainsaw to go past the tree and cut into the ground, as that can damage your chainsaw.
If one or both ends of the tree are off the ground, you’re going to make two cuts. If you only do a single cut from the top of the tree, you risk pinching your saw between the wood, and it’s a pain to get your saw blade unstuck. The first buck cut comes from underneath. Stop cutting 1/3 the way of the diameter of the tree.
The second cut comes from the top. Line up your chainsaw with the bottom cut.
Repeat the process until you’re done bucking the tree.
That’s It!
You’ve successfully felled, limbed, and bucked a tree. Congratulations! You’re well on your way to becoming a lumberjack. Now it’s time to load up your bucked logs in your pickup truck and haul them back to your woodshed for splitting. When you’re done, enjoy a big stack of flapjacks, a pile of bacon, and lots and lots of eggs and hash browns.
Any other advice on felling a tree? Share it with us in the comments!


