With our archives now 3,500+ articles deep, we’ve decided to republish a classic piece each Sunday to help our newer readers discover some of the best, evergreen gems from the past. This article was originally published in May 2015.
Earlier this year when I made a video about how to plan your week, several viewers commented on the Quasimodo-like hunchback I displayed. As a guy who spends much of his time sitting slumped over a laptop, I was aware I had developed a terrible slouch. And I wasn’t proud of it. Not only did it make me look unconfident and lazy, little did I know, my poor posture was also wreaking havoc on my upper body flexibility. I discovered this while filming another video — this time on how to do a low bar squat.
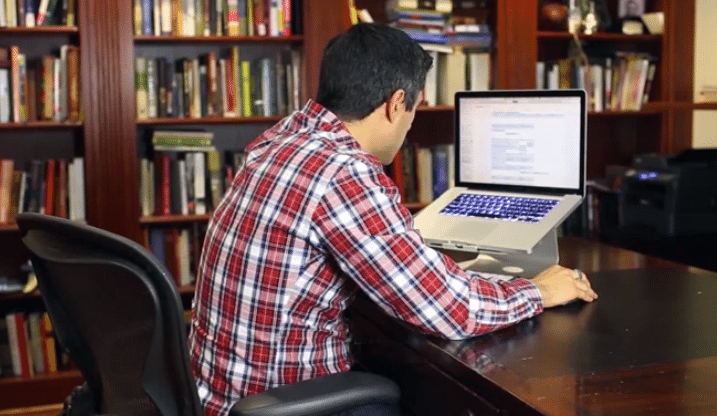
Me getting my slouch on.
Up until that point, I had never done a low bar squat; I had always performed the high bar variety. Getting the bar in proper position on the former requires a considerable amount of flexibility in the chest and shoulders. Your wrists need to be neutral, or straight, throughout the entire lift to avoid any of the weight being carried by your wrists or arms. If you have any wrist bend, you’re setting yourself up for a bad case of tendonitis in the elbow.
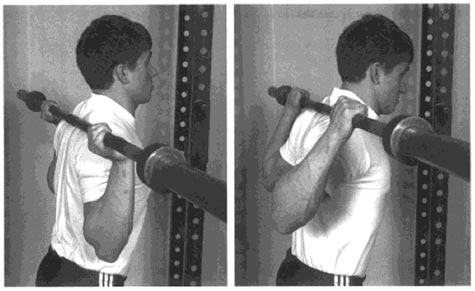
I looked like the guy on the left.
Despite ample gruff encouragement from my indomitable coach, Mark Rippetoe, I was never able to get my wrists straight while squatting, something plenty of YouTube commenters again made note of — much to my chagrin. The problem was that I simply didn’t have any flexibility in my shoulders or chest to place the bar in the proper position while maintaining straight wrists. My inflexibility was so bad that Rip even asked me if I had ever injured my shoulder or chest! I hadn’t — at least to my knowledge.
I started to investigate what would cause so much tightness in my chest and shoulders, and the one thing that kept popping up was chronic slouching. When you slouch, your shoulders turn in, which causes your chest to sink in as well. If you keep yourself in a slumped-over position day in and day out for hours at a time, you’re going to lose flexibility in your shoulders and chest in a big way.
But slouching has other pernicious effects besides slowing your squat gains. According to Dr. Jason Quieros, a chiropractor at Stamford Sports and Spine in Connecticut, “every inch you hold your head forward [while slouching] you add 10 pounds of pressure on your spine.” If you’re like most chronic desk slouchers, you’re likely leaning your head towards your monitor by 2 or 3 inches. That’s 20 to 30 pounds of extra weight that your back and spinal column have to endure for extended periods of time.
In the short term, this can cause jaw aches and headaches, but in the long term it can result in kyphosis, or a permanently visible Quasimodo-esque hump on your upper back. Kyphosis isn’t just an aesthetic problem, either. It can cause pain due to excess strain on the spine, as well as breathing difficulties due to pressure on the lungs from the caved-in chest that comes with a rounded back.
Not wanting to become the hunchback of Notre AoM, I started researching different stretches and exercises I could implement to undo the consequences of years of slumping and hunching.
Below I share six different exercises you can do to counteract the ill effects of slouching. They’ve helped me de-Quasimodo myself — maybe they’ll help you too. These exercises, of course, should be done in conjunction with a concerted effort to maintain good posture throughout the day while you’re working.
The Routine
I typically do all of the exercises below on my rest days. A few of them, I’ll do before I start squatting (I note which ones below). Ever since I started incorporating these exercises into my fitness routine, my flexibility and posture have improved significantly. I’m happy to report that I’m now able to get my wrists straight in the low bar squat, and have become a healthier, more upright gent all around!
Doorway Stretch
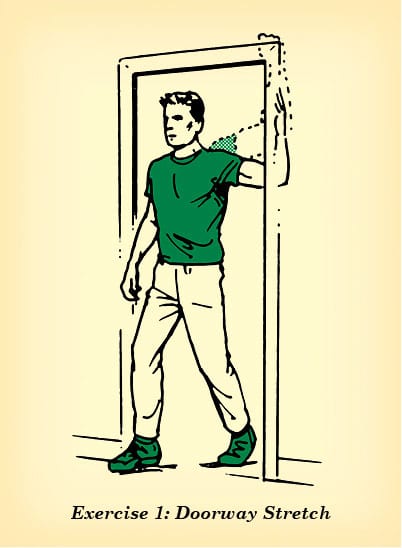
The doorway stretch is wonderful for counteracting the sunken chest you may have developed from years of slouching. This stretch (along with the shoulder dislocation exercise) have been key for me in developing the flexibility needed to properly low bar squat. Not only do I do these as part of a full anti-slouch routine during my rest days, I’ll also perform them before I squat so that I’m flexible enough to get in the proper position.
Stand inside a doorway (you can also stand next to a squat rack if you’re at the gym). Bend your right arm 90 degrees (like you’re giving a high five) and place your forearm against the doorframe. Position your bent elbow at about shoulder height. Rotate your chest left until you feel a nice stretch in your chest and front shoulder. Hold it for 30 seconds. Repeat with the opposite arm.
You can emphasize different parts of your chest by adjusting the height of your bent elbow on the doorframe. The lower your elbow, the more your pectoralis major gets stretched; the higher your elbow, the more you stretch your pectoralis minor.
Pectoral Ball Smash
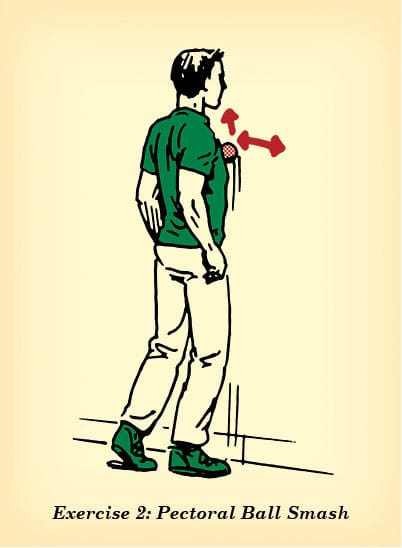
Another great way to loosen up tight muscles in your chest is doing some trigger point release with a lacrosse ball.
Simply place the ball between your chest and the wall. Roll the ball around on your chest until you find a “hot spot” — you know you’ve found one if it hurts when the ball rolls over it. When you find a trigger point, stop and just rest on the ball for 10 to 20 seconds. Contrary to popular belief, it’s the pressure, not the rolling, that smoothes fascia and releases tight, knotty muscles. Continue rolling and finding more trigger spots.
I usually do a five-minute session of the pectoral ball smash 3X a week.
Shoulder Dislocations
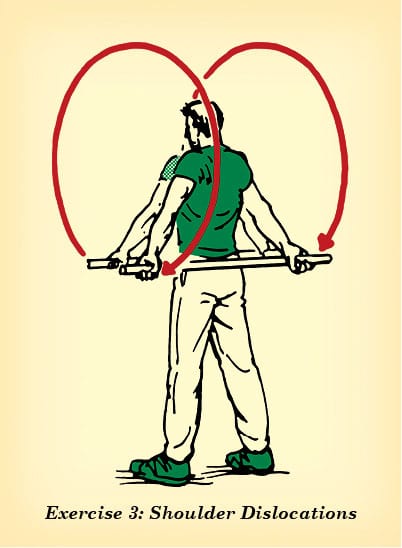
This movement does wonders for loosening up shoulders that have become tight from years of turning inward while slouching. Don’t worry, you don’t actually dislocate your shoulders with this exercise!
You’ll need a PVC pipe or broomstick that’s about five feet in length.
Hold the PVC pipe in front of you with an overhand grip. If your shoulders are really inflexible, start off with a pretty wide grip — as wide as possible. As your flexibility increases, you can begin to narrow your grip.
Slowly lift the PVC pipe in front of you, then over your head, until it hits you in the back/butt area. Then come back to the starting position. Again, do this SLOWLY. If you do it too fast, you’re likely to injure yourself.
I’ll typically do three sets of 10 reps, a rep being taking the stick behind you and bringing it back. I do a few sets of these before I squat and even during my rests between sets. It’s been highly effective in allowing me to get in proper position for the low bar squat.
Thoracic Extension on Foam Roller
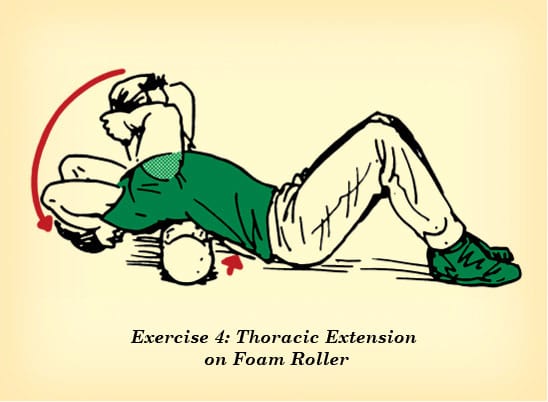
The thoracic spine composes the middle segment of your spine. When you see someone with a pronounced hunched back, you’re seeing what happens to the thoracic spine when you chronically slouch. After a while, it loses so much mobility that getting back into the correct and healthy position becomes difficult.
To increase mobility so that your thoracic spine isn’t so hunched over, do some extensions on a foam roller.
Place the foam roller under your upper back. Feet and butt should be on the floor. Place your hands behind your head and bring your elbows as close together as you can. Let your head drop to the floor, and try to “wrap” yourself around the foam roller. Begin to roll the foam roller up and down your back, searching for “hot spots.” When you find one, lift your head up and really dig your back into the foam roller. Lay your head back down and continue searching for more hot spots along your thoracic spine.
Prone Y Extension
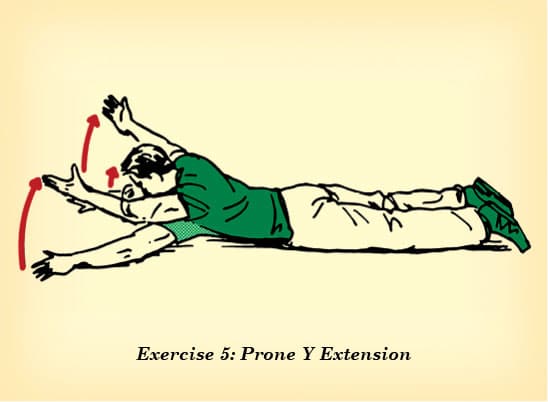
I discovered this movement from a fella who runs a site called BuiltLean. It works your shoulders and thoracic spine.
Lie facedown on the floor and put your hands above your head in a “Y” position with your palms facing down. Lift up your torso, just like you would with a back extension while simultaneously externally rotating your shoulders so that your palms face each other at the top of the movement. Keep your head in line with your neck and back. Hold that position for 5 to 10 seconds. Slowly lower yourself down to the starting position and repeat 10 more times.
Wall Angels
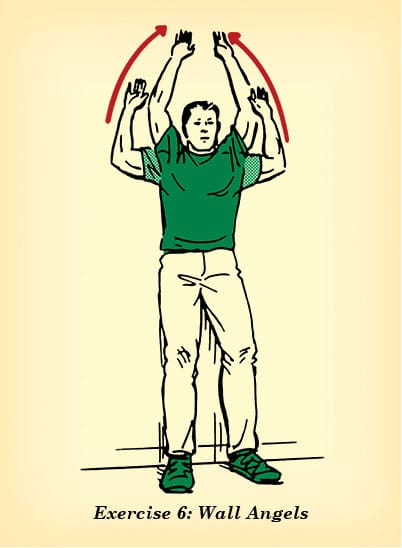
I learned this exercise from physical therapist Jane Anderberg. It’s another stretch that works the thoracic spine and can help counteract the formation of a hunchback. It may not look like it, but this exercise will have you grunting in pain after a few reps. It’s deceptively difficult.
Start with knees slightly bent, and your lower back, upper back, and head pressed against the wall. Arms are also on the wall, with your fingers pushed against it. Think of giving the “It’s good!” football sign.
Move your arms up above your head, like a snow angel. The key is to keep your fingers, entire back and butt, and head pushing into the wall. The tendency will be to arch out. If your backside loses contact with the wall, you’re doing it wrong.
There you go. Perform these exercises regularly, and you need not spend your life slumping around a bell-tower, or slouching over a laptop.
Illustrations by Ted Slampyak


