Editor’s note: The following is an excerpt from Overcoming Gravity: A Systematic Approach to Gymnastics and Bodyweight Strength by Steven Low.
Several books could be written on handstands alone. The information presented here is condensed and will focus only on the most important points of each technique. Many of the finer details are so physical, so individual, so movement- or balance-related, they cannot be understood simply through written words. A good coach with hands-on experience trumps all.
It is important to maintain proper technique while performing any type of handstand, and not just for aesthetics. Proper handstand technique stacks all of your joints in alignment and reduces the amount of muscular effort required to perform the movement. This makes the handstand significantly easier, and also improves body awareness and positioning for other skills you will learn in bodyweight training.
In the same way that the squat is foundational to human movement, handstands are one of the fundamental positions in bodyweight training. If your execution of an unweighted or air squat is lacking, you will likely not be able to execute loaded techniques like front squats, weighted back squats, overhead squats, and Olympic lifts. Without a solid foundation in the squat, all of your other exercises will fail to develop correctly. Proper handstands carry the same effect with many other bodyweight training techniques.
The handstand is the one skill that should be trained almost every day if you desire to become proficient in bodyweight training. Certain variations like the wall handstand make it very easy to log quality skill work without jeopardizing rest and recovery. Constant practice and refinement of handstand technique will yield consistent rewards in the future.
Note that performance on skill-based movements will typically fall into a bell curve based on consistency and progression. For example, when you begin practicing handstands you will normally fail all the time — then, as you improve, you will begin achieving two-second holds here and there. Further improvement will lead to consistent two-second holds, as well as occasional holds of around nine seconds. From this we can conclude two things:
- The length of holds falls in the middle of the bell curve where your most consistent performance lies. This means that your abilities are best summed up by your consistent attempts. The median or average of your holds defines your ability.
- There are outliers where you tend to do better or worse than your regular performance.
Do not focus on the outliers. When it comes to practicing skills, the key is to make them consistent. Raise the consistency of your holds by aiming toward the goal of performing the skill well all the time. In a sample group of ten handstand holds, you may perform zero seconds once, two seconds once, four seconds six times, eight seconds once, and ten seconds once. Your goal is to focus on obtaining the four-second range consistently and then improving upon it, rather than aiming for ten seconds all the time with mixed results. The human condition is to focus on the best (and post videos of it to YouTube or Instagram) and push the worst out of the mind. Instead, focus on becoming consistent. Consistency is key to developing greater static and dynamic body awareness. If you become fatigued and inconsistent in your holds, take a break. Don’t push yourself too hard for that one ten-second hold, because that is not as important as overall consistency.
Additionally, it is imperative to minimize the roll out or pirouette fall as you exit the handstand position. Falling over in any handstand position tends to reinforce bad habits. It tells your body, “When I hit the point where I cannot hold a stable handstand, I need to bail out.” Instead you should be fighting for every inch and every position, especially when you are learning. You obviously want to emphasize form, but if you do not learn how to fight for the handstand position you (1) do not build the strength-stability in your muscles to fight for it, and (2) you teach yourself bad habits.
To summarize, here are the concepts to focus on for handstands:
- If possible, work on handstands almost every day.
- Emphasize correct body positioning at all times.
- Focus on overall consistency.
- Form is the priority, but always fight for the handstand instead of bailing.
- Practice does not make perfect; perfect practice makes perfect.
You may encounter psychological issues with maintaining focus or fighting frustration if your holds aren’t where you’d like them to be. If this occurs, step back, take a rest break, and calm yourself by practicing deep breathing (in through your nose, out through your mouth). This will slow your heart rate and increase concentration. Take time to visualize the movement in your mind before attempting it again once you are calm and rested. This practice can be used for any type of skill work, not just handstands.
To build the ability to consistently perform full, freestanding handstands, you should develop your technique on each of the following levels:
Wall Handstand — Levels 1-4
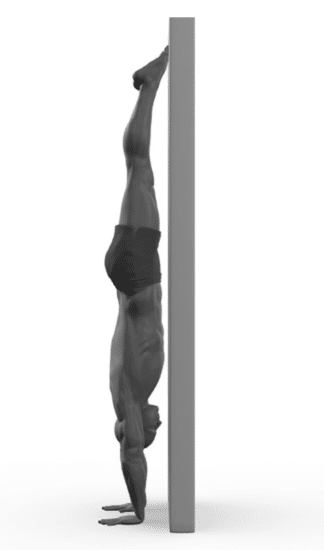
Wall handstands (which can be abbreviated Wall HS) are a category all to themselves for the first four difficulty levels. Wall handstands should be performed with the following technique notes in mind:
- Hands shoulder-width apart. This is important in the long run for handstand push-ups, so do not get in the habit of hands wide when starting.
- Stomach to the wall.
- Hands as close to the wall as possible without tipping over. Your wrists will typically be two to six inches from the wall, depending on the width of your body.
- Arms locked straight.
- Pushed tall as much as possible. Your shoulders should be pushed as far away from your hands as possible, with your shoulder blades elevated. (Your shoulders should effectively be earmuffs with your armpits facing as far out as possible.)
- Thoracic spine fully extended. Your chest should be upright, which should generate some tension through the abdominals.
- Pelvis slightly posteriorly rotated. While your lower back is naturally curved in extension when standing, this should be gently reversed when you are in the handstand position. To cue this motion, squeeze your glutes slightly and simultaneously maintain tension on your abdominals (trying to bring your belly button back toward your spine). This should help eliminate the arch, a common error seen in handstand practice.
- Legs oriented neutrally so that they are in line with the rest of your body from all angles. There is a small amount of leeway here; our hips may need to bend in order for your toes to touch the wall. The closer to the wall your hands are placed, the less this will happen.
- Knees locked straight, with your toes pointed in order to keep your body tight. You can squeeze your legs together in order to generate tension and maintain proper handstand posture.
- Your scapulas should be fully elevated. At the height of elevation, retract them slightly in order to stabilize them.
All of these body cues summarize the ideal position for a handstand: a straight line with no bending anywhere in the body. Since your body is going to be rigid like a plank of wood, small movements will control the portion that is in the air. Your forearms and hands (which are on the floor) will perform all of these small movements. To allow for the greatest amount of control, spread your fingers out as far as possible and exert pressure through your fingertips in order to maintain balance. Hand positioning against the floor will be further addressed in the grip section.
As you can imagine, using only your wrists to control a handstand will be difficult initially. New athletes who are learning the handstand will often use their shoulders and hips to change their body shape and balance a handstand. This will cause their shoulders to come out of alignment with their head and the rest of their body, and their feet will move around a lot while in the air. Resist this temptation — it will instill bad habits that are hard to break. A proper handstand held for a minute or longer should primarily work your forearms (if you have the requisite strength). The rest of your body should be relatively unused except maybe some endurance burn in your shoulders.
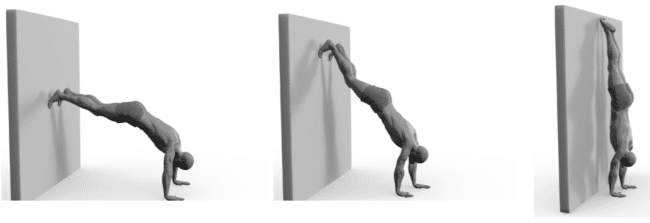
The sequence above illustrates the technique to move into the stomach-to-wall wall handstand. Begin in a pushup position and slowly walk your legs up the wall while you simultaneously walk your hands closer to the wall. Keep your body straight and do not arch your back (doing so will force you out of the position via a forward roll or pirouette). If you are new to wall handstands, you may not be ready to perform this to the full extent that your stomach is against the wall. Only go as far as you are comfortable. If you are a beginner, you should only touch the wall with the tips of your toes. Over time, you will feel more at ease with this exercise and can conquer your fears by moving your stomach closer to the wall.
Once you become proficient with wall handstands, there will come a time where you barely push your toes off the wall. You will use your wrists to correct the overbalance by digging down with your fingers. This will keep you from tipping over. Avoid arching your lower back in order to compensate for when you push your toes off. Any adjustments should be made with your wrists.
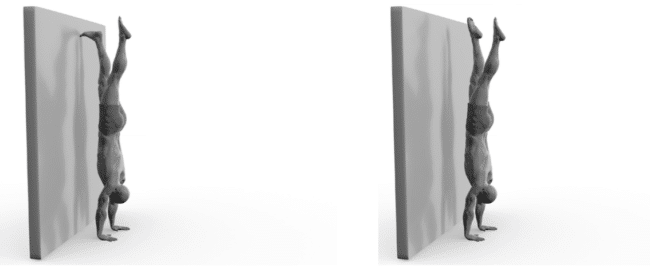
You can also push off from a handstand with split feet (shown above). To do this, begin with a balanced handstand position and split your feet apart with one foot remaining on the wall. Next, slowly move your remaining foot off the wall, bringing both feet together while maintaining balance. Hold this position for as long as possible.
As you become more proficient with this, you will be able to balance with both feet away from the wall for longer and longer periods. When you can hold this position for fifteen to twenty seconds, split your handstand workout into two parts: 1) kick up to freestanding handstands and 2) continue to work on your balance with freestanding wall handstands. Once you can consistently hold the position for thirty seconds or more (while maintaining proper balance with your body straight), it is time to solely focus on your freestanding kick to handstand movement.
Rolling Out and Pirouetting
There are two basic techniques to suddenly end (bail from) a handstand: rolling out and pirouetting. Rolling out is the best method if you are working against the wall — it correlates better to maintaining body positions. Using the pirouette movement to bail from a handstand as a beginner can lead to the development of bad habits. Stick with the roll out.

First, practice your forward roll on the ground.

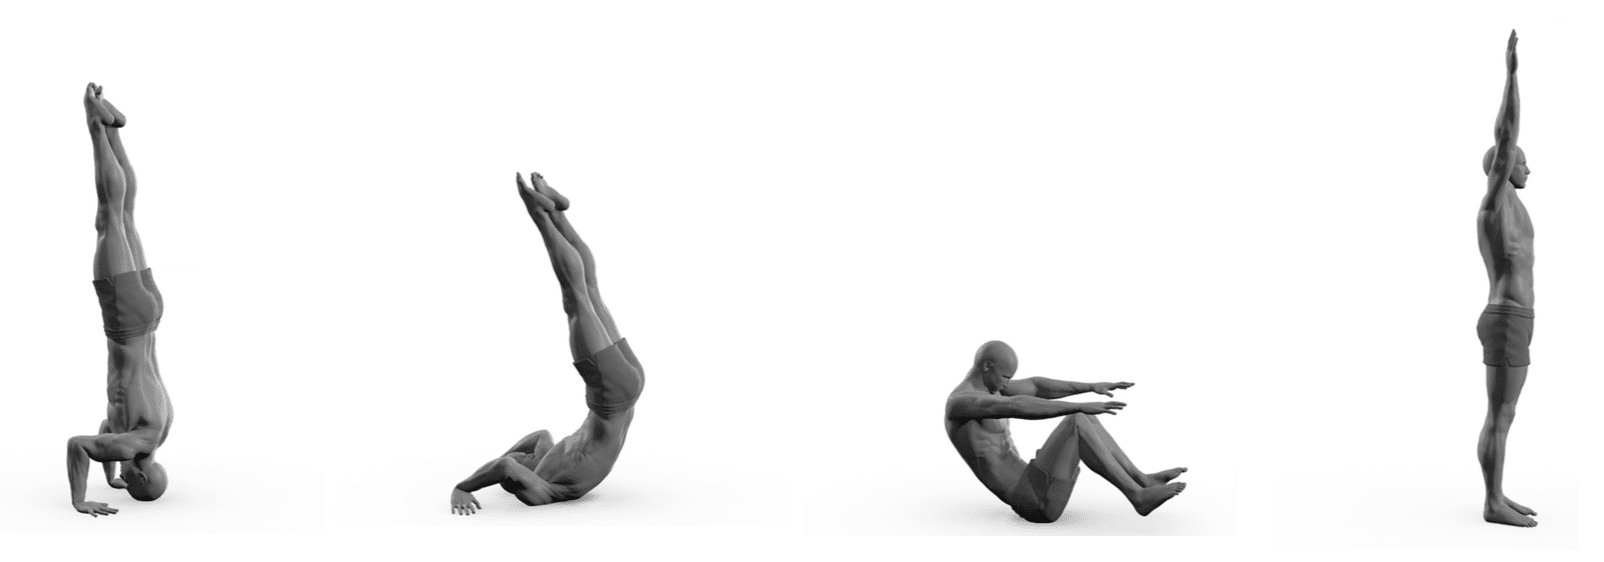
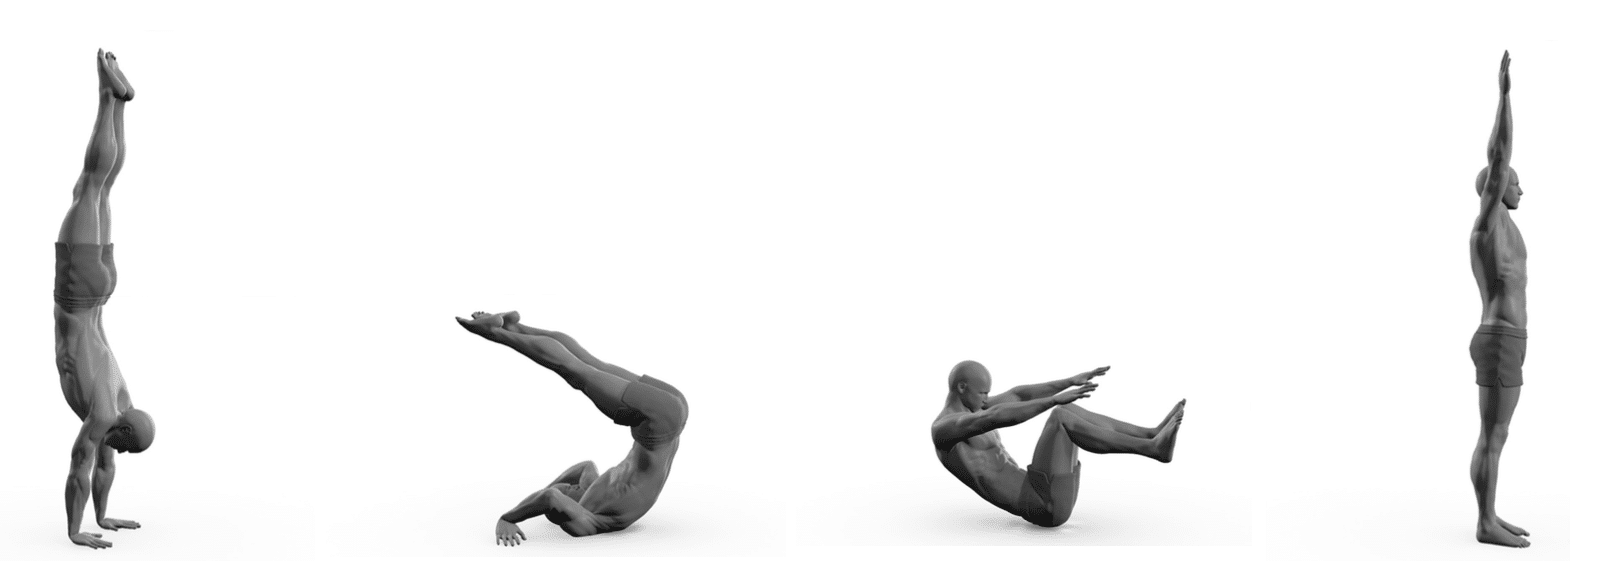
Rolling out of a handstand is an extension of the forward roll on the ground. If you are not proficient in the forward roll you should first practice it on a soft mat or grass. Apply pressure through your hands such that when you tuck your chin to your chest you will be able to put your weight on the back of your neck and roll smoothly out of a movement.
Working from the handstand position, bend your arms slowly so that you lower toward the ground in a controlled manner. From there, tuck your chin to your neck and curl your body into a fetal position as you allow gravity to move you through the roll. Above are some sequences you can practice to become more proficient in rolling out.
If you are unsure of how to do this correctly or fearful of rolling out from the handstand position, there are two options. The first option, which is preferred, is to ask for help from a spotter. They can hold your legs or ankles up and help you execute the roll in slow motion until you feel more comfortable. The other option is to learn how to pirouette out of a movement by twisting your body.
Kicking Up

The lunge to handstand (shown above) is often performed improperly. To get a sense of how much force is needed when kicking up to a handstand, start by practicing against the wall with your back to the wall. Make sure the movements are as consistent as possible. Mechanically, here is a set of instructions that beginners should follow:
- First, you want to take the handstand position upright: straight body standing with the arms overhead. This makes the kick up to a handstand much easier because you keep your body in alignment throughout the entire motion. Without this setup, your body will not be tight and will therefore not be controlled while you perform the movement. You should go into the movement with your legs together, arms overhead, shoulders “in” your ears, chest up, and core/shoulders tight.
- During the motion of kicking up to a handstand, the only part of the setup that will change is you will lunge with your leg — this is the hinge on which your body will rotate while remaining straight. The reason you move your lunging leg out of alignment is so you do not compromise the straight body, arms overhead position you previously set up.
- Place your lunging leg approximately half of your height in front of you. Shift your weight onto that leg as you begin to tilt your upper body down for the kick up to a handstand. Your hands should lead the way. Be sure to keep the knee of your lunging leg as straight as possible to maintain proper tension in your hamstrings. Once your hands hit the ground, dig in with your fingertips to stabilize the handstand as you kick up. Use the tension in your hamstrings to kick up your lunging leg.
- At this point your legs should be together — in the air, above you — in a perfect straight-body position. If anything came out of alignment during the movement (such as your legs spreading apart), appropriate compensation will be necessary. Things like this will happen while you are learning. One way to determine what you did wrong is taking a video of yourself performing the movement, or you can have someone who has mastered it watch you and coach you in the right direction.
If you can execute the lunge to handstand correctly, you are in good shape. From there, all you have to do is exert the force necessary to hit the correct position during the kick up and be sure to apply the pressure from your fingertips. You may find it useful to use a wall at first to figure out how much power should be in your kick. Once you become proficient at kicking up, you should feel like you can lock into a perfect handstand at the top of the movement without wobbling.
Note that the back-to-the-wall handstand is a technique that can be used to teach a proper handstand. This is especially helpful if you lack the strength or technique to bail out of a handstand with your stomach to the wall. If you do use this technique, try to phase it out as soon as possible.
Grip
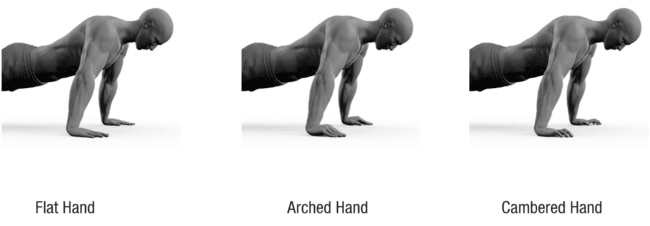
There are a few different ways to grip the ground: flat hand, arched hand, or cambered hand. There is nothing wrong with the flat and arched hand positions, but if you are working toward high-level handstand movements, you should use the cambered hand position. This hand position allows you to generate more tension in your hand, enabling stronger, more precise corrections that are useful for advanced movements.
- The flat-hand grip is pretty straightforward — your whole hand is flat against the ground. It can be hard to balance a handstand with this grip, as you do so with your palms and fingertips.
- The arched-hand grip (or dome hand) puts only your fingertips and the heel of your hand in contact with the ground. This allows for full handstand balance much easier.
- The cambered-hand grip is a bit different. You begin by placing your palm in contact with the ground, then curling your fingertips in a manner that a dome is created, but only from your fingertips, as your entire palm remains in contact with the ground. This grip gives your hand three points of ground contact: fingertips, top of palm, and heel of palm. For an excellent analysis of this grip, visit the website of physical therapist Shon Grosse.
If you are falling forward, dig your fingertips into the ground. If you are falling over backward, distribute your weight through your palms. The additional control from the cambered-hand grip may help those of you who are having problems with balance in the skill. Note that getting used to the new position may require some practice.
Freestanding Handstand — Level 5
A freestanding handstand (which can be abbreviated Free HS) is essentially a wall handstand without the wall. All of the same techniques used to perform a wall handstand apply. Because wall handstands are easier, most beginner athletes start there and work up to freestanding handstands.
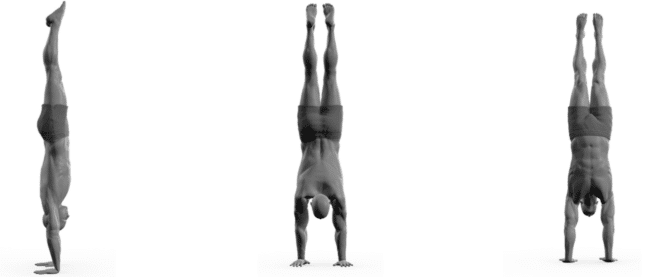
Scapular positioning: Your scapulas should be fully elevated. At the height of elevation, retract them slightly for stability.
If you walk into any gymnastics gym and tell every person present to kick up to a handstand and hold it, here is what you will see: Those with the best handstands are the most skilled overall, while those with the worst handstands are the least skilled overall. Handstands are one of the most fundamental movements in gymnastics and in bodyweight training as well. It is critical to become proficient in them, as it will make flipping, twisting, and other body movements that occur between being upright and being inverted much easier to execute. They provide an overview of an athlete’s proprioceptive and kinesthetic awareness in the inverted position, which is counter-intuitive to normal body positioning. In a word: they are a critical skill to acquire.
Develop the freestanding handstand position on the floor, then move to parallettes and rings as you become more proficient. Rings handstands and one-arm handstands will be the true test of your handstand abilities long-term. It is actually easier to perform handstands on the parallettes (because it is easier to obtain a better grip), but it is safer to begin on the floor, especially if you have just progressed from wall handstands to freestanding handstands. If you still need to work on kicking up, bail techniques, and/or grip, you should read through the previous sections.
You should seek to reduce wobbling in both the dynamic and static senses. For the dynamic motion, you want to be able to kick straight up to a handstand without wobbling at all. It takes a lot of practice to learn proper control, as kick-up force is hard to modulate. You do not want to under-balance and come back down; nor do you want to over-balance and be forced to compensate by arching your back or walking on your hands. For the static motion, obtain a solid handstand position so that you only have to make a few corrections using your wrists. This level of superior control will look good to any observers, and it requires far less energy than wobbling back and forth.
Once you have developed the position through wall handstand training and become proficient in it, all it takes to achieve a freestanding handstand is consistent practice. Practice every day if you are able. If you need additional information or further visualization, here are some additional resources:
- Valentin Uzunov’s “The handstand: A four stage training model”
- GMB’s handstand tutorial
- Antranik’s comprehensive handstand tutorial
__________________
Steven Low, author of Overcoming Gravity: A Systematic Approach to Gymnastics and Bodyweight Strength, is a former gymnast and a Senior Trainer for Dragon Door’s Progressive Calisthenics Certification (PCC). In addition to earning a Doctorate of Physical Therapy, he has also spent thousands of hours independently researching the scientific foundations of health, fitness, and nutrition and is able to provide many insights into practical care for injuries. His own training is varied and intense with a focus on gymnastics, parkour, rock climbing, and sprinting.
Tags: Exercises


